Windows 11 on the OnePlus 6T
Microsoft's own Windows on ARM overview introduces Windows on ARM (WoA) pretty well:
Windows has traditionally run on machines that are powered by x86/x64 processors, but more recently, also runs on devices powered by Arm processors.
Arm-powered devices are particularly interesting because the power-frugal nature of the Arm architecture enables these devices to offer longer battery life while delivering great performance. Arm Systems on Chip (SoC) often include other key features such as a powerful CPU, GPU, Wi-Fi & mobile data networks, as well as Neural Processor Units (NPUs) for accelerating AI workloads.
WoA refers to desktop Windows 10/11 on devices running ARM processors, like the Lenovo Yoga C630 or Surface Pro X. Both of these devices run Qualcomm Snapdragon processors, just like what's in the majority of Android phones. What's stopping people from running these ARM Windows builds on their Android phones?
Turns out, not much. Developers have managed to port a complete enough EDK2 UEFI to Snapdragon-based devices and have called it Renegade Project, having great support for Snapdragon 845 and 855 devices. Windows can run on this environment, and it has driver support for things like the GPU thanks to official WoA laptops having very similar hardware.
With all this, we can install Windows 10 or 11 ARM64 on devices like the OnePlus 6T, so I've decided to make a comprehensive guide after going through this process a few times.
Overview
To begin, I've structured this guide into six parts:
- Universal
- Follow these steps regardless of Singleboot or Dualboot
- Singleboot
- Follow these steps only if you are doing Singleboot
- Dualboot
- Follow these steps only if you are doing Dualboot
- Windows Tips
- Useful tips for handling Windows
- Post-install Tips
- Additional things to know regarding how to use the dualboot capability
- Reverting
- How to revert the changes if you ever want to remove Windows from your 6T
As you can see, you can install Windows while keeping Android available if you want.
I recommend reading the guide before you begin, just to know what you're working with.
Supported Hardware
Renegade Project's UEFI doesn't offer complete support for every piece of hardware in the 6T when running Windows, so here's what hardware is and isn't supported in Windows:
Working
- USB
- Up to USB 2 (max supported by the 6T)
- Internal UFS 2.1 storage
- Internal display
- Buttons
- Working for navigation in UEFI and fully working in Windows
- Touchscreen
- Fully working in UEFI and Windows
- Wi-Fi
- Driver can be unstable and crash the phone but you can force reboot
- Bluetooth
- Battery status
- Charging
- GPU
- DirectX 9/10/11/12 with D3D feature level 11_1
- Cellular (maybe)
- Cellular data (LTE) doesn't work for some people
- Calls and texts untested
- Location (GPS)
- Appears to work using the Windows Maps app, location accuracy shows to be "within 16ft"
Not working
- Mute switch (ring/vibrate/silent)
- Virtualization (Hyper-V, WSA, WSL2 or QEMU HV)
- Sensors
- Gyroscope, accelerometer, ambient light, hall and any others don't work
- Biometrics (Under-display fingerprint sensor)
- Built-in audio (internal speaker)
- USB and Bluetooth audio work fine though
- Cameras
- Wide camera and ultra-wide camera
- NFC
Information from Renegade Project's legacy support matrix.
Install Methods
Singleboot
This is the simpler of the two methods. What we do for this is remove Android's userdata partition, replacing it with an EFI ESP and an NTFS data partiton, put the UEFI firmware on the phone, then install Windows.
Your 6T will only be able to boot Windows if you choose to follow this method.
Dualboot
This is a little more tedious to pull off, but still simple. What we do for this is remove the Android userdata partiton, create a new smaller one, create an EFI ESP and NTFS data partition for Windows to live on, install Android, abuse the 6T's A/B partition layout to put the UEFI firmware on one of the phone's boot slots so you can switch to it easily, then install Windows.
Your 6T will be able to boot Android or Windows if you choose to follow this method.
Requirements
Universal Requirements
You'll need this stuff regardless of whether you go with the singleboot or dualboot configuration.
Hardware
- OnePlus 6T of course
- Codename
fajita, this guide is specifically for this device. The process is similar for other devices supported by Renegade Project but things may vary and are not covered here.
- Codename
- USB-C to USB-A cable
- for plugging in the 6T
- USB keyboard and mouse
- USB drive of atleast 8GB capacity
- USB-C to A adapter and a USB hub so you can use the keyboard, mouse and USB drive simultaneously
- x86/x64 Windows machine
- You can also use a Mac/Linux/ARM64 Windows machine, but you'll still need x86/x64 Windows to run MsmDownloadTool
Software
- A copy of the Android platform-tools (Windows, macOS or Linux) for using ADB and fastboot
- A copy of the drivers for Qualcomm EDL (QDLoader 9008) mode, you can get those here (needed for MsmDownloadTool to interact with the 6T)
- A copy of the OnePlus USB drivers which you can get here (needed for using ADB and fastboot on the 6T)
- The last supported version of the UEFI firmware for the OnePlus 6T (version 2.0rc2) which you can get here
- An ARM Windows ISO. You can use UUPdump (Windows) or CrystalFetch (macOS) to create one, or download mine.
You can use Windows 11 or Windows 10, but Windows 11 is more touch-friendly and runs just as well as 10 does, giving you a better overall experience.
Insider builds are also supported but come with the same stability risks as they do normally. - Renegade Project requires that the phone be on the OxygenOS/HydrogenOS (OOS) 10 firmware, so if you were running OOS 11 or custom ROMs that require the firmware from OOS 11, you must restore back to OxygenOS 10 firmware using this copy of MsmDownloadTool. Doing so will wipe all data, restore OxygenOS and re-lock your bootloader.
- Windows drivers for the 6T - extract this and put the
outputfolder somewhere safe - Rufus - to write the ISO to your USB drive (also, their inclusion of UEFI:NTFS makes things much easier)
- TWRP boot image - you must partition from TWRP, as partitioning from WinPE/Windows can brick the device (due to partition names and how the NAND drivers work) and require restoring with MsmDownloadTool!
- parted from this post on XDA (this is the partitioning tool)
Preparing parted
The download for parted includes a few versions of itself, but we only need one:
- Open the
parted-3.4folder - Open the
aarch64folder - Copy
partedsomewhere safe.
We'll be transferring parted to the 6T later, so don't worry it being compatible with your PC.
Additional Requirements for Singleboot
None
Additional Requirements for Dualboot
You'll want to grab some more software to complete the dualboot, see below.
Software
- lineage-17.1-20210422-nightly-fajita-signed.zip - Latest LineageOS 17.1 (Android 10) build I could find, you can use other Android 10 ROMs but I tested with this one.
- Optional: Open GApps - Google Apps to go with the Android ROM, choose the nano variant for Android 10 ARM64
- TWRP installer zip - having TWRP as the recovery makes switching slots easy and I prefer it to the Lineage recovery (plus, you can't update to newer LineageOS builds with Renegade Project installed so not having their recovery isn't an issue)
Installation (Universal Steps)
Click to expand universal steps
Windows image preparation
Windows doesn't support any of the hardware in the 6T out of the box, so we'll need to add the drivers into the Windows image now. You can use an x86/x64 or ARM64 Windows PC or VM for this part, as long as you can connect your USB drive.
Start off by grabbing that output folder (the one with all the 6T drivers in it) from earlier and the ARM64 Windows ISO, then put both on your Desktop.
You can then use Rufus to write the ISO image to your flash drive. If Rufus asks to customize the Windows installation before writing the ISO image, check the following:
- Remove requirement for 4GB+ RAM, Secure Boot and TPM 2.0
- Remove requirement for an online Microsoft account
- Disable BitLocker automatic device encryption
then press OK.
Once that's done being written to the USB drive, use File Explorer to navigate into your USB drive, then head into the sources folder. Find install.wim and move it to your Desktop.
Open an administrator command prompt, then run the following command:
dism /get-wiminfo /wimfile:%USERPROFILE%\Desktop\install.wim
This will list the editions in your particular wim file. In my case, there's Windows 11 Pro at an index of 1, so that's what I'll go with. If your wim has more editions, go with whatever as long as you remember the index for it.
Once you know which index you're going to use, run the following command (where x is your index number):
dism /mount-wim /wimfile:%USERPROFILE%\Desktop\install.wim /index:x /mountdir:%USERPROFILE%\Desktop\temp
This will mount the wim so it can have the drivers integrated.
Once the operation completes succesfully, run this next command:
dism /image:%USERPROFILE%\Desktop\temp /add-driver /driver:%USERPROFILE%\Desktop\output /recurse
It should start iterating through all of the drivers one by one, reporting success for each.
After that's done, finish up by running this command:
dism /unmount-wim /mountdir:%USERPROFILE%\Desktop\temp /commit
This will save changes, then unmount the wim.
Once it completes succesfully, you will need to copy the install.wim from your Desktop back onto the USB drive.
With this done, the install media on the USB drive now has drivers for all of the 6T's devices, like the touchscreen, GPU, and more. You can now delete the temp folder, wim, Windows ISO and driver folder from your desktop if you want to save some storage.
Windows Driver Setup
Now we need to setup our x86_64 (Intel/AMD CPU) Windows computer so it can interact with the 6T. Make sure that BitLocker is off (or at least paused), then ensure that Secure Boot is disabled (if you're using a UEFI computer).
Now you can install drivers:
- Run
bcdedit.exe -set TESTSIGNING ONto enable test signing (the Qualcomm EDL 9008 drivers aren't signed for normal use) - Reboot your computer
- Install the EDL 9008 drivers and reboot if it asks you (extract
Qualcomm_QDLoader_HS-USB_Driver_64bit_Setup.zipand run the setup program) - Install the OnePlus USB Drivers (extract
OnePlus_USB_Drivers.zipand runOnePlus_USB_Drivers_Setup.exe) - Reboot one final time
Restoring Android 10
You can skip this section if your 6T wasn't running Android 11 or newer.
- Power off your OnePlus 6T
- Press and hold both volume buttons on the 6T, then plug it into your computer
- Run MsmDownloadTool V4.0.exe (extract
fajita_41_J.50_210121.zip)
The 6T should show up in MsmDownloadLook like it does here:
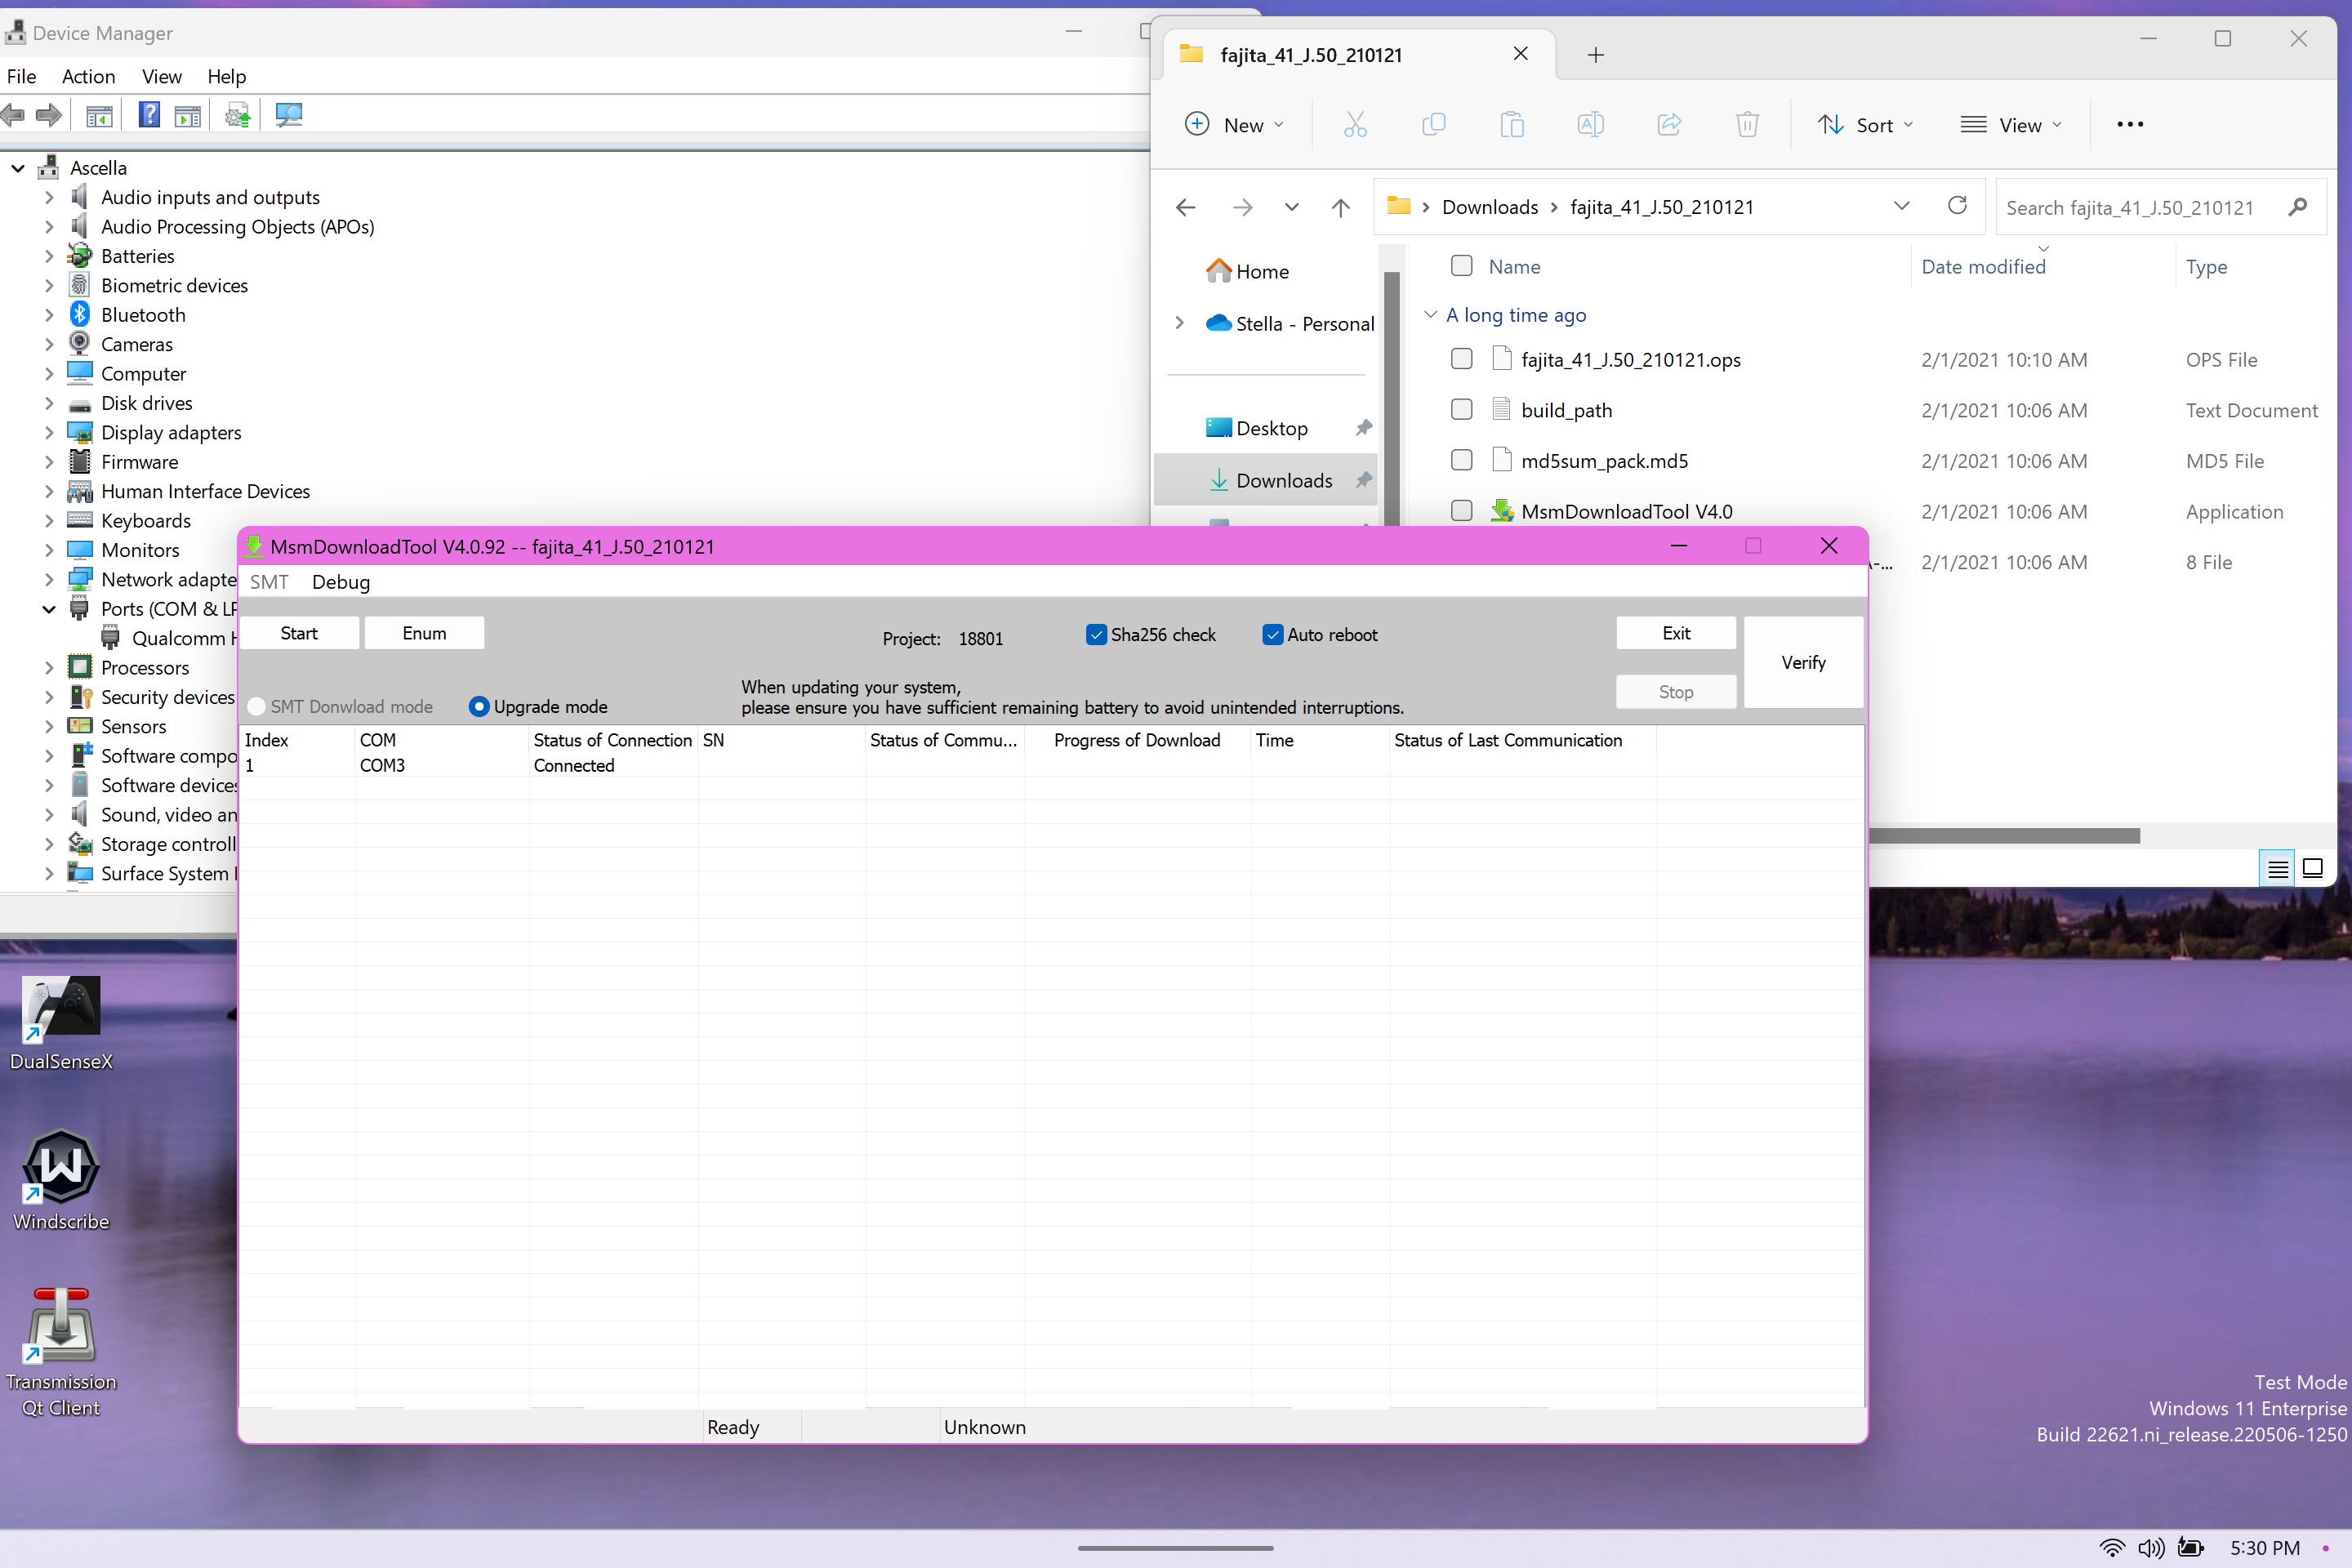
Click Start on the top left to start the restore process, then wait a few minutes. Once it's done, you'll see 'Download Complete' in green and the phone should reboot and start loading Android.
Unlocking the bootloader
Proceed through Android setup as quickly as possible (skip Wi-Fi connection, skip Google login, skip screen lock creation, etc), then go to the Settings app -> About phone and tap Build number until developer options enable.
Back out of About phone, then open System -> Developer options and enable OEM unlocking as well as USB debugging.
With that enabled we can return to our computer (any OS, as long as it can run the Android platform-tools) and open a terminal.
In the terminal, run the following command: adb devices
You should see something resembling the below:
[Stella@Moonlight-The-Original] ~ > adb devices
* daemon not running; starting now at tcp:5037
* daemon started successfully
List of devices attached
226541e8	unauthorized

[Stella@Moonlight-The-Original] ~ >
On the phone, trust the computer for debugging and then run adb reboot bootloader from your computer.
The phone should now reboot out of Android and into fastboot mode. You'll be able to tell by the phone's display now showing 'START' at the top of the display as well as some system information.
You can now run fastboot oem unlock on the computer, it should say OKAY [ 0.037s] or similar. On the phone, use the volume buttons to navigate to UNLOCK THE BOOTLOADER and press the power button to select it. The phone will now reboot, show a warning about the bootloader being unlocked, and it will factory reset Android.
Preparing to partition
You'll need to run through initial setup and enable + trust USB debugging again so you can run adb reboot bootloader to get to fastboot again. Once you're in fastboot, you will want to boot that TWRP boot image you downloaded earlier with the following command:
fastboot boot [path to img]
In my case, the command I used is as follows (make sure to adjust for your path):
fastboot boot /Users/Stella/Downloads/twrp-3.7.0_9-0-fajita.img
Once you run the command, you should see an output similar to this, which indicates success:
Sending 'boot.img' (33116 KB)                      OKAY [  0.777s]
Booting                                            OKAY [  0.077s]
Finished. Total time: 0.875s
If you see something like this, then you didn't give fastboot the right path:
fastboot: error: cannot load '<file>': No such file or directory
Try again if needed, and once successful you should see TWRP boot on the 6T.
Now it's time to copy parted to the 6T, so find the parted file you saved earlier, get it's path and get out your terminal again to run a command like this:
adb push [path to parted] /tmp/parted
In my case, the command I used is as follows (make sure to adjust for your path):
adb push /Users/Stella/Downloads/parted /tmp/parted
Just like before, if you see something similar to what's below, then it succeeded:
/Users/Stella/Downloads/parted: 1 file... 1217.6 MB/s (1097536 bytes in 0.001s)
Otherwise, check your path and try again. Once the file is copied onto the 6T, you'll want to run adb shell to get an instance of the phone's shell on your computer (so you don't have to type in stuff on the phone!)
Once you're in the adb shell (the prompt should say OnePlus6T:/ # now), you will want to run these commands:
chmod +x /tmp/parted && cd /tmp./parted /dev/block/sda
If done correctly, you should see similar to the following:
[Stella@Moonlight-The-Original] ~ > adb shell
OnePlus6T:/ # chmod +x /tmp/parted && cd /tmp
OnePlus6T:/tmp # ./parted /dev/block/sda
GNU Parted 3.4
Using /dev/block/sda
Welcome to GNU Parted! Type 'help' to view a list of commands.
(parted)
Partitioning
Enter print and parted should output something really similar to what's below:
(parted) print
Model: SAMSUNG KLUDG4U1EA-B0C1 (scsi)
Disk /dev/block/sda: 125GB
Sector size (logical/physical): 4096B/4096B
Partition Table: gpt
Disk Flags:

Number  Start   End     Size    File system  Name         Flags
 1      24.6kB  32.8kB  8192B                ssd
 2      32.8kB  33.6MB  33.6MB  ext4         persist
 3      33.6MB  34.6MB  1049kB               misc
 4      34.6MB  35.7MB  1049kB               param
 5      35.7MB  36.2MB  524kB                keystore
 6      36.2MB  36.7MB  524kB                frp
 7      36.7MB  305MB   268MB   ext4         op2
 8      305MB   316MB   10.5MB               oem_dycnvbk
 9      316MB   326MB   10.5MB               oem_stanvbk
10      326MB   334MB   8290kB               reserve1
11      334MB   351MB   16.6MB               reserve2
12      351MB   352MB   524kB                config
13      352MB   3350MB  2999MB  ext2         system_a
14      3350MB  6349MB  2999MB  ext2         system_b
15      6349MB  6454MB  105MB   ext4         odm_a
16      6454MB  6559MB  105MB                odm_b
17      6559MB  125GB   118GB   ext4         userdata

(parted)
Important Notice: If you see a different output (like no userdata partition or a different number of partitions), stop and get help. Touching the wrong partitions can hard-brick your 6T!
Now that we're in parted and know what we're working with, we can start partitioning. We'll remove partition 17, which is the Android userdata partition. The command to use is simply rm 17, you may have to confirm the action (with y) and ignore the error (with i), as shown below:
(parted) rm 17
Warning: Partition /dev/block/sda17 is being used. Are you sure you want to
continue?
Yes/No? y
Error: Partition(s) 17 on /dev/block/sda have been written, but we have been
unable to inform the kernel of the change, probably because it/they are in use.
As a result, the old partition(s) will remain in use.  You should reboot now
before making further changes.
Ignore/Cancel? i
(parted)
The userdata partition has been removed which requires a reboot to properly take effect, so quit parted with quit, exit the adb shell with exit, then run adb reboot fastboot to reboot to fastboot where you can boot the TWRP image again. Then push parted to the phone again like before. Once pushed, open an adb shell and run these again:
chmod +x /tmp/parted && cd /tmp./parted /dev/block/sda
If done correctly, you should see similar to the following again:
[Stella@Moonlight-The-Original] ~ > adb shell
OnePlus6T:/ # chmod +x /tmp/parted && cd /tmp
OnePlus6T:/tmp # ./parted /dev/block/sda
GNU Parted 3.4
Using /dev/block/sda
Welcome to GNU Parted! Type 'help' to view a list of commands.
(parted)
This means we're in parted, so run print again and parted should output something really similar to what's below:
(parted) print
Model: SAMSUNG KLUDG4U1EA-B0C1 (scsi)
Disk /dev/block/sda: 125GB
Sector size (logical/physical): 4096B/4096B
Partition Table: gpt
Disk Flags:

Number  Start   End     Size    File system  Name         Flags
 1      24.6kB  32.8kB  8192B                ssd
 2      32.8kB  33.6MB  33.6MB  ext4         persist
 3      33.6MB  34.6MB  1049kB               misc
 4      34.6MB  35.7MB  1049kB               param
 5      35.7MB  36.2MB  524kB                keystore
 6      36.2MB  36.7MB  524kB                frp
 7      36.7MB  305MB   268MB   ext4         op2
 8      305MB   316MB   10.5MB               oem_dycnvbk
 9      316MB   326MB   10.5MB               oem_stanvbk
10      326MB   334MB   8290kB               reserve1
11      334MB   351MB   16.6MB               reserve2
12      351MB   352MB   524kB                config
13      352MB   3350MB  2999MB  ext2         system_a
14      3350MB  6349MB  2999MB  ext2         system_b
15      6349MB  6454MB  105MB   ext4         odm_a
16      6454MB  6559MB  105MB                odm_b

(parted)
You can see that partition 17 is now no longer appearing, which leaves it ready to have new partitions made.
The 6T is ready to be partitioned; you can now open the section that corresponds to the configuration you chose.
Installation (Singleboot)
Click to expand singleboot instructions
Partitioning (continued)
EFI partition
Use the command mkpart to begin the process of creating a partition, and parted will begin asking you specifics about the partition, which you can use the information below for:
- Partition name:
esp - File system type:
fat32 - Start:
6559MB - End:
7059MB
This creates a 500MB EFI partition
NTFS partition
Use mkpart once again with the following information:
- Partition name:
fruity - File system type:
ntfs - Start:
7059MB - End:
125GB
Formatting
Run print and you should now see 18 partitions listed, 17 should be called esp and 18 should be called fruity. You can now reboot the phone with adb reboot bootloader to apply our changes.
Boot the TWRP image again, this time not pushing parted to it. Open a shell again with adb shell and run the following commands:
mkfs.fat /dev/block/by-name/espmkfs.ntfs /dev/block/by-name/fruity(this one might take a while)
These commands format the partitions we created earlier so that they're ready for use.
Exit the adb shell, then continue to Flashing UEFI
Installing Windows
Flashing UEFI
To make things easier, we'll be flashing the UEFI firmware to the 6T now. This prevents us having to manually boot it using our computer while we install Windows.
With the 6T in recovery, run adb reboot bootloader to get to fastboot so you can flash the firmware. Flash the UEFI firmware to the 6T with the following commands:
fastboot flash boot_a [path to img]
fastboot flash boot_b [path to img]
In my case, the command I used is as follows (make sure to adjust for your path):
fastboot flash boot_a /Users/Stella/Downloads/boot-fajita.img
fastboot flash boot_b /Users/Stella/Downloads/boot-fajita.img
Once you run the commands, you should see outputs similar to this, which indicate success:
Sending 'boot_b' (5874 KB)                         OKAY [  0.155s]
Writing 'boot_b'                                   OKAY [  0.032s]
Finished. Total time: 0.202s
After you see this, continue to Booting the UEFI.
Booting the UEFI
We are now at a point where all we need to do is boot the UEFI, then deploy Windows, which means you'll need that USB drive with the Windows installation media we customized earlier.
With the way we flashed the firmware, your 6T will boot to the UEFI unless you use the button combos for fastboot.
Booting Windows
Ideally, have a powered USB hub (like the USB-C ones with power inputs), or fully charge your 6T before beginning.
Grab your USB hub, keyboard, mouse and USB drive with the customized Windows installation media, and plug them all into your 6T. Now, force reboot by pressing and holding Power and Volume down, until it reboots. Your 6T should eventually boot to the UEFI, showing a GUI boot menu. Tap UEFI Boot Menu, tap Boot, tap Simple Init, then tap Boot again. This should reboot the GUI boot menu, working around a bug in the UEFI which makes it sometimes not show USB boot items.
After all that, the GUI boot menu should now show a UEFI OS on #8 or similar, so select it and then tap Boot.
You should now see the UEFI:NTFS log and eventually a Windows boot animation like below:
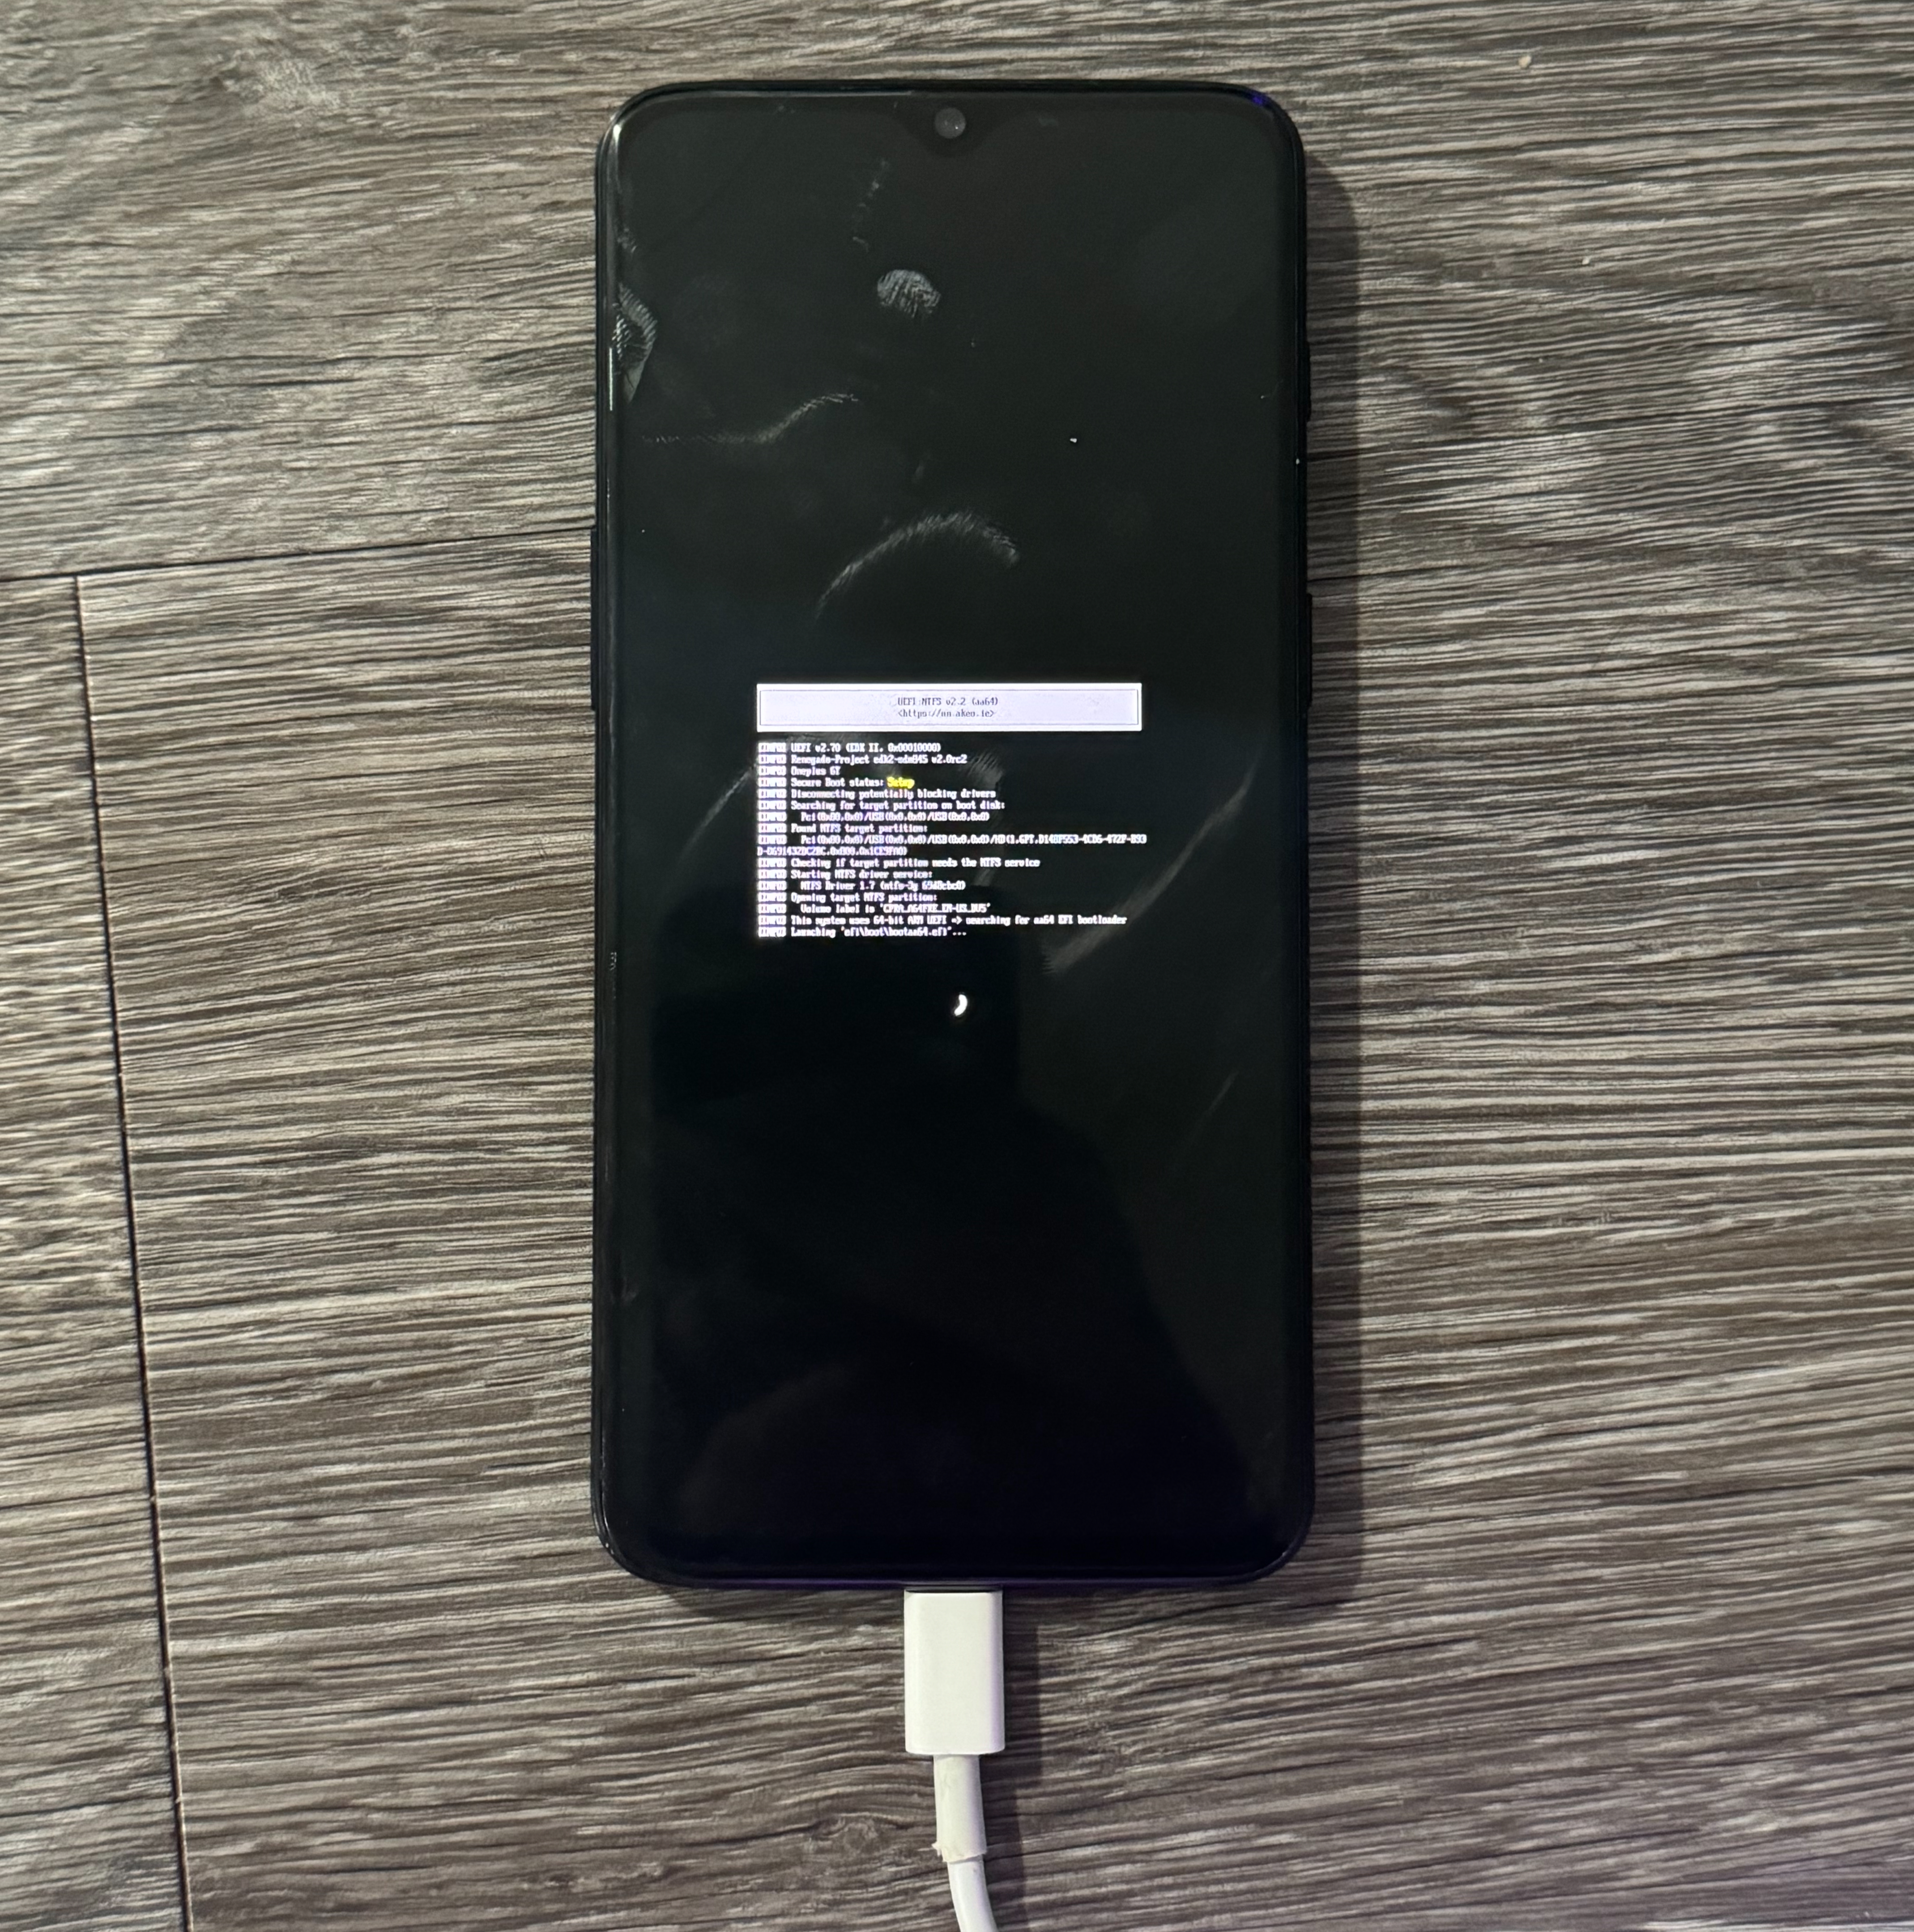
Windows will boot to the Setup screen, where you should select your language and keyboard layout, then press Next. After this, do not continue with Windows' built-in setup utility.
Assigning drive letters
Press Shift+F10 on the keyboard to bring up a Command Prompt, then run diskpart. Once it's done loading, type in list disk. There should be 6 disks, and one will have the capacity of your 6T's internal storage. Select it with sel disk x, where x is that disk's number. In my case it was 0, so I ran sel disk 0 to select it.
Run list part now, and you should see 18 partitions. Partition 17 is the ESP and partition 18 is the NTFS partition for Windows to live on. Let's assign drive letters, so we can deploy Windows.
Run the following commands:
sel part 17- Selects the EFI partition
ass- Assigns the next free drive letter
sel part 18- Selects the NTFS partition
ass- Assigns the next free drive letter again
exit- Closes diskpart
Now we need to get our drive letters, so run notepad. Click File, Open, then in the File Explorer window, click This PC and it should show all drives.
In my case, the EFI partition ended up being I:\ and the NTFS partition ended up being C:\ and the install media ended up being F:\, so write down whatever your drive letters end up being as we'll need them.
Deploying Windows
Use the following command to deploy Windows, filling in the values to match your config:
dism /apply-image /imagefile:[installmedia drive letter]:\sources\install.wim /index:x /applydir:[ntfs partition drive letter]:\
[installmedia drive letter]should be the drive letter that corresponds to your install mediaxshould be the index on the wim we customized earlier[ntfs partition drive letter]should be the drive letter that corresponds to the NTFS data partition
With my values, I ran the following:
dism /apply-image /imagefile:F:\sources\install.wim /index:1 /applydir:C:\
This will take a while as it's installing Windows onto the internal storage.
It should complete succesfully after a few minutes.
Applying boot files
Now it's time to make Windows bootable!
Run the following command:
bcdboot [ntfs partition drive letter]:\Windows /s [EFI partition drive letter]: /f UEFI
With my values, here's how it looked:
bcdboot C:\Windows /s I: /f UEFI
Once it's done, you should see "Boot files succesfully created" which means we just have one final step to take care of!
Some of the drivers used for this are unsigned, so we will need to enable test signing!
In the command prompt, switch to your EFI drive (just type the letter, like I:) and then cd [EFI partition drive letter]:\EFI\Microsoft\Boot to get into the folder where we need to make our changes.
I ran cd I:\EFI\Microsoft\Boot since that's what I had assigned.
Once you do that, you can then run these commands in order:
bcdedit /store BCD /set "{default}" testsigning on
bcdedit /store BCD /set "{default}" nointegritychecks on
bcdedit /store BCD /set "{default}" recoveryenabled no
These should all complete succesfully!
Now, close any windows you might've opened, then close the Windows Setup window to reboot and then unplug the flash drive. The phone will probably BSOD, so just wait for it to reboot (or force reboot it.) The UEFI firmware should now automatically start booting Windows, and you can continue to Universal part 2.
End of Singleboot installation section
Don't accidentally do the steps in the dualboot section
Installation (Dualboot)
Click to expand dualboot instructions
Partitioning (continued)
Android userdata
Use the command mkpart to begin the process of creating a partition, and parted will begin asking you specifics about the partition, which you can use the information below for:
- Partition name:
userdata - File system type:
ext4 - Start:
6559MB - End:
xMB
x is where you'll decide how much storage to allocate to Android. Add 6559 to the amount of storage in MB to give Android. If you want to give Android 32GB like I did, add 6559 to 32768 for 39327, so you'll tell parted that the End is 39327MB.
If you get a warning about the partition not being aligned, you can just ignore that with i.
Run print again, and take note of the End value for partition 17 as we'll need it for the next partition.
EFI partition
Use mkpart again with the following information:
- Partition name:
esp - File system type:
fat32 - Start: the
Endvalue for partition 17 from the last step - End:
xMB
x is gonna be the End value for partition 17 with 500MB added to it. If the End was 39.3GB, then this End should be set to 39.8GB.
NTFS partition
Use mkpart once again with the following information:
- Partition name:
steva - File system type:
ntfs - Start: the
Endvalue you used for the EFI partition earlier - End:
125GB
Formatting
Run print and you should now see 19 partitions listed, 17 should be called userdata, 18 should be called esp and 19 should be called fruity. You can now reboot the phone with adb reboot bootloader to apply our changes.
Boot the TWRP image again, this time not pushing parted to it. Open a shell again with adb shell and run the following commands:
mke2fs -t ext4 /dev/block/by-name/userdatamkfs.fat /dev/block/by-name/espmkfs.ntfs /dev/block/by-name/steva(this one might take a while)
These commands format the partitions we created earlier so that they're ready for use.
Installing Android
With the partitioning done, we can now move onto installing Android.
Reboot the phone with adb reboot bootloader and boot the TWRP image again. At the TWRP homescreen, tap Advanced then tap ADB Sideload. Check both boxes, then slide to start.
On your computer, run adb sideload [path to android rom zip], where [path to android rom zip] is the path to the Android ROM zip you downloaded earlier.
On my machine, the command ended up being adb sideload /Users/Stella/Downloads/lineage-17.1-20210422-nightly-fajita-signed.zip, but make sure to adjust for your path.
That should start installing Android on the phone, and once TWRP displays ADB Sideload Complete at the top of the screen, you can adb reboot bootloader and boot the TWRP image again.
Head to Advanced -> ADB Sideload, don't check either box, then slide to start. Now you can adb sideload any other zip you might want to install for Android, like GApps.
Once you install that stuff, install the TWRP installer zip you downloaded earlier in the same manner to finalize our installation, then use the Reboot System button in TWRP to reboot to Android.
You can set up Android as normal, setting a screen lock, Google account, etc. Once that's done, head to the Settings app and go to the Storage section. The amount of storage used and the displayed total will very likely be wrong and you can ignore it as long as the amount of available storage lines up with what you allocated when partitioning. Since I allocated 32GB for Android's userdata partition, it says I have 31.37GB free of 64GB total.
We're now done with installing Android, and you can start using the phone as normal! Just don't update past Android 10 or else you won't be able to run Windows.
Installing Windows
Flashing UEFI
To make things easier, we'll be flashing the UEFI firmware to the 6T now. This prevents us having to manually boot it using our computer while we install Windows. We'll be taking advantage of the fact that the 6T has two boot slots (a and b), normally meant for seamless Android updates. Due to the way these boot slots work, we can use them to essentially have a fully-fledged dual-boot on the phone.
With your 6T running Android, enable + trust USB debugging so you can run adb reboot bootloader to get to fastboot again. In fastboot, you will want to get the active boot slot by running fastboot getvar current-slot.
After you know which slot is the active one (in my case slot a), flash the UEFI firmware to the inactive slot (in my case slot b) with the following command:
fastboot flash boot_[slot] [path to img]
In my case, the command I used is as follows (make sure to adjust for your path and slot):
fastboot flash boot_b /Users/Stella/Downloads/boot-fajita.img
Once you run the command, you should see an output similar to this, which indicates success:
Sending 'boot_b' (5874 KB)                         OKAY [  0.155s]
Writing 'boot_b'                                   OKAY [  0.032s]
Finished. Total time: 0.202s
After you see this, the UEFI is now installed on the 6T and is ready to go. When you actually want to install Windows, proceed to Booting the UEFI.
Booting the UEFI
There's more ways to do this, but for installation purposes we'll be doing it from fastboot so boot it on your 6T now.
From fastboot, run fastboot --set-active=[slot] where [slot] is the slot you flashed the UEFI firmware to (so run fastboot --set-active=b if you flashed to slot b like me).
We are now at a point where all we need to do is deploy Windows, which means you'll need that USB drive with the Windows installation media we customized earlier.
Booting Windows
Ideally, have a powered USB hub (like the USB-C ones with power inputs), or fully charge your 6T before beginning.
Grab your USB hub, keyboard, mouse and USB drive with the customized Windows installation media, and plug them all into your 6T. Now, power on your 6T and it should boot to the UEFI, showing a GUI boot menu. Tap UEFI Boot Menu, tap Boot, tap Simple Init, then tap Boot again. This should reboot the GUI boot menu, working around a bug in the UEFI which makes it sometimes not show USB boot items.
After all that though, the GUI boot menu should now show a UEFI OS on #8 or similar, so select it and then tap Boot.
You should now see the UEFI:NTFS log and eventually a Windows boot animation like below:
Windows will boot to the Setup screen, where you should select your language and keyboard layout, then press Next. After this, do not continue with Windows' built-in setup utility.
Assigning drive letters
Press Shift+F10 on the keyboard to bring up a Command Prompt, then run diskpart. Once it's done loading, type in list disk. There should be 6 disks, and one will have the capacity of your 6T's internal storage. Select it with sel disk x, where x is that disk's number. In my case it was 0, so I ran sel disk 0 to select it.
Run list part now, and you should see 19 partitions. Partition 18 is the ESP and partition 19 is the NTFS partition for Windows to live on. Let's assign drive letters, so we can deploy Windows.
Run the following commands:
sel part 18- Selects the EFI partition
ass- Assigns the next free drive letter
sel part 19- Selects the NTFS partition
ass- Assigns the next free drive letter again
exit- Closes diskpart
Now we need to get our drive letters, so run notepad. Click File, Open, then in the File Explorer window, click This PC and it should show all drives.
In my case, the EFI partition ended up being I:\ and the NTFS partition ended up being C:\ and the install media ended up being F:\, so write down whatever your drive letters end up being as we'll need them.
Deploying Windows
Use the following command to deploy Windows, filling in the values to match your config:
dism /apply-image /imagefile:[installmedia drive letter]:\sources\install.wim /index:x /applydir:[ntfs partition drive letter]:\
[installmedia drive letter]should be the drive letter that corresponds to your install mediaxshould be the index on the wim we customized earlier[ntfs partition drive letter]should be the drive letter that corresponds to the NTFS data partition
With my values, I ran the following:
dism /apply-image /imagefile:F:\sources\install.wim /index:1 /applydir:C:\
This will take a while as it's installing Windows onto the internal storage.
It should complete succesfully after a few minutes.
Applying boot files
Now it's time to make Windows bootable!
Run the following command:
bcdboot [ntfs partition drive letter]:\Windows /s [EFI partition drive letter]: /f UEFI
With my values, here's how it looked:
bcdboot C:\Windows /s I: /f UEFI
Once it's done, you should see "Boot files succesfully created" which means we just have one final step to take care of!
Some of the drivers used for this are unsigned, so we will need to enable test signing!
In the command prompt, switch to your EFI drive (just type the letter, like I:) and then cd [EFI partition drive letter]:\EFI\Microsoft\Boot to get into the folder where we need to make our changes.
I ran cd I:\EFI\Microsoft\Boot since that's what I had assigned.
Once you do that, you can then run these commands in order:
bcdedit /store BCD /set "{default}" testsigning on
bcdedit /store BCD /set "{default}" nointegritychecks on
bcdedit /store BCD /set "{default}" recoveryenabled no
These should all complete succesfully!
Now, close any windows you might've opened, then close the Windows Setup window to reboot and then unplug the flash drive. The phone will probably BSOD, so just wait for it to reboot (or force reboot it.) The UEFI firmware should now automatically start booting Windows, and you can continue to Universal part 2.
End of Dualboot installation section
Windows Tips
Click to expand Windows Tips
Fixing WinDeploy
Windows has a good chance of crashing during the initial setup phase (when it shows "Getting Ready"), and if it does you'll see an error saying something along the lines of "The computer restarted unexpectedly or encountered an unexpected error. Windows installation cannot proceed."
You can fix the installation to not have to redeploy Windows.
Press Shift F+10, then run regedit. Navigate to the following path in the registry editor:
HKEY_LOCAL_MACHINE\SYSTEM\Setup\Status\ChildCompletion
Once you're viewing the ChildCompletion key, double-click setup.exe and set the value data to 3. You can then close regedit, the command prompt window and press OK on the error to reboot the 6T.
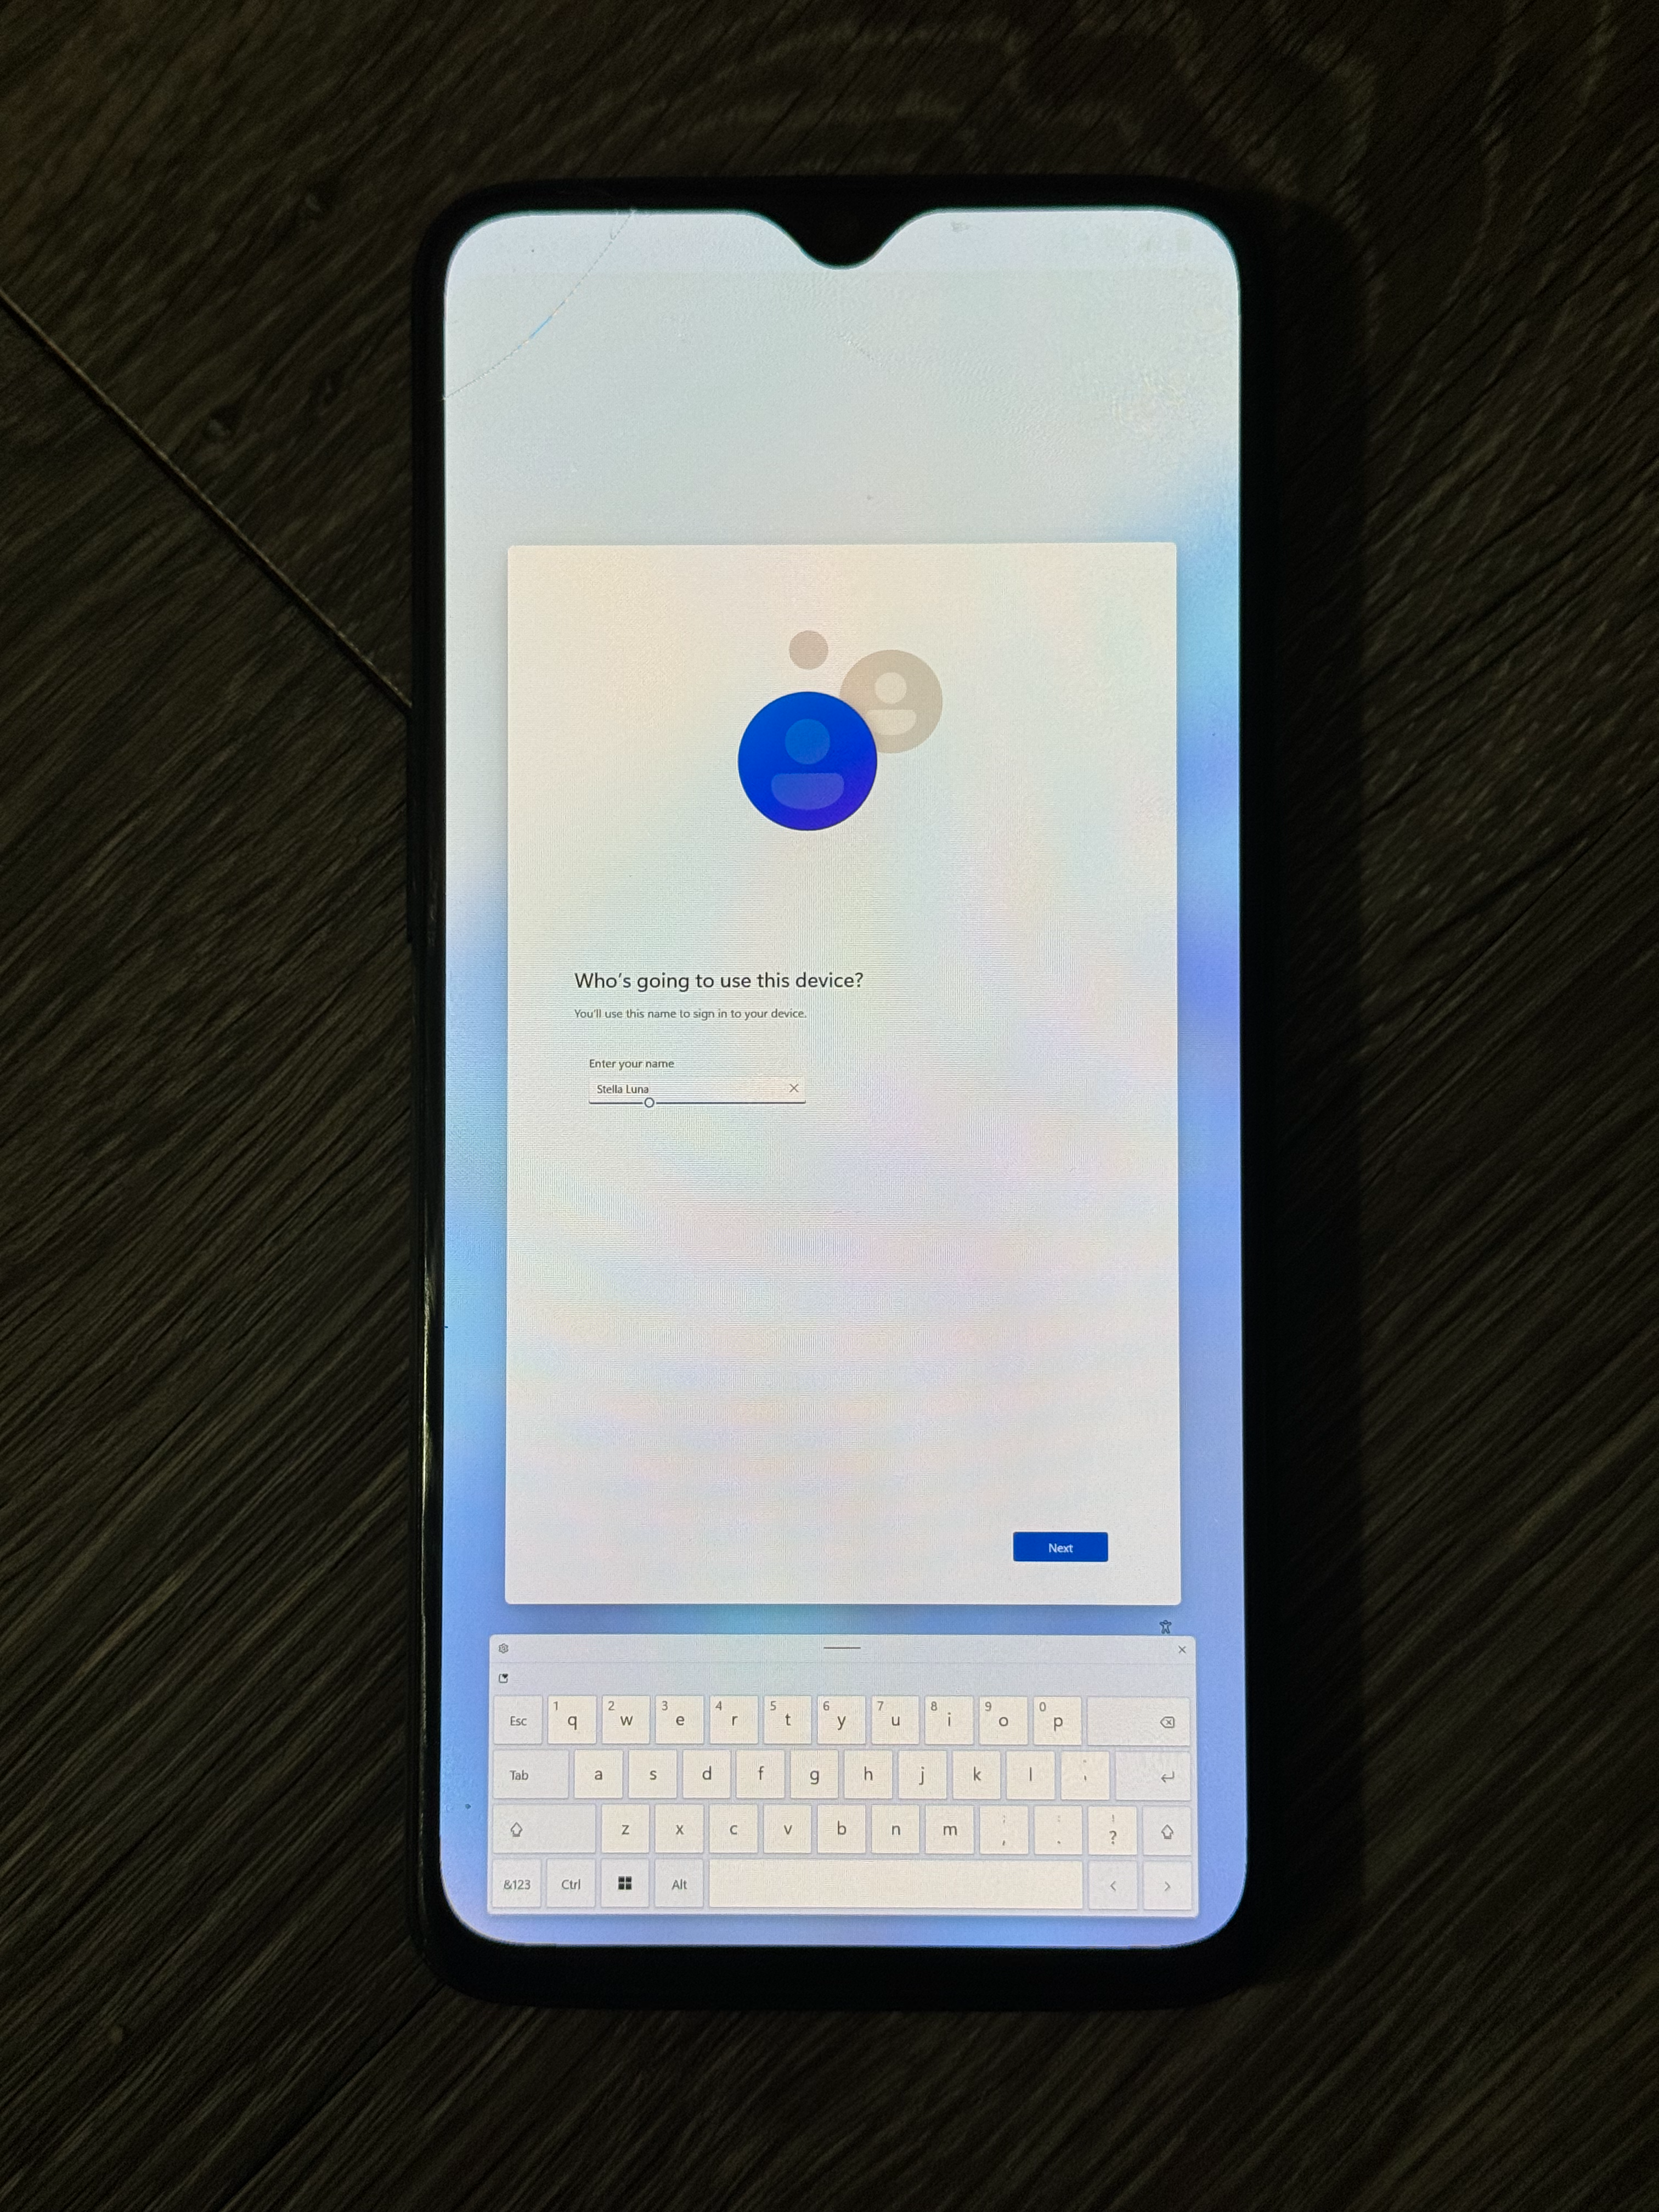
Completing OOBE
Eventually, the 6T will boot to the Out Of Box Experience. Press Shift F+10 on your keyboard, then run oobe\bypassnro. This will make it so that you don't need an internet connection to finish OOBE.
From here, you should be able to progress through OOBE with just the touchscreen (it should be working at this point):
Once you get to the desktop, you may realize that Wi-Fi isn't working, which we can tackle as well.
Increasing UI scaling and setting landscape orientation.
Open the settings app, then go to System > Display. Set Display orientation to Landscape, then set Scale to 150% or 175%, depending on what you're comfortable with.
Fixing Wi-Fi
Open Device Manager (you can long press the Windows button in the taskbar or press Win+X on a keyboard to show the tools menu), then find the following device:
Qualcomm(R) WCN3990 Wi-Fi B/G/N/AC (2x2) Svc
Select it, then go to Action > Uninstall device. Do not check the option to remove the driver software, then press Uninstall. Once it's not showing in the list anymore, go to Action > Scan for hardware changes. This should re-enumerate the Wi-Fi adapter and re-attach the driver leading to functional Wi-Fi.
Adding virtual keyboard and trackpad buttons to the taskbar
Open the settings app, then go to Personalization > Taskbar. Expand System tray icons, then set Touch keyboard to Always and enable Virtual touchpad.
You can make the virtual keyboard bigger as well, back out to the Personalization menu, then go to Text input. Scroll down to Touch keyboard then increase the size to your desired value.
Post-install Tips (Universal)
Click to expand post-install tips
Extra Partitions
You may see extra partitions from within Windows, such as a 119 MB partition with image and verinfo folders inside. Or, other disks shown with strange capacities. Don't touch these, they are volumes and data structures not intended to be modified by the user and touching them has a very high chance of bricking your 6T.
Dualbooting
Dualbooting from Windows
Shut down Windows, then power on the 6T manually. When you see the GUI boot menu, tap UEFI Boot Menu then scroll down until you see Reboot to other slot. Select it, then tap Boot. Your 6T will now boot into Android.
Dualbooting from Android
To make this easier, we'll be using the Advanced restart feature in LineageOS. Go to Settings > System > Developer options and enable Advanced restart.
If you don't have an Advanced restart option, you can reboot to recovery manually by using the button combo which you can find on Google.
Now press and hold the power button, tap Restart, then tap Restart into Recovery. Once you're in TWRP, decrypt your userdata by entering your screen lock credential, then once at the TWRP homescreen tap Reboot. Then tap the button that corresponds to the slot that's currently inactive (TWRP will tell you which one is active).
Reverting
Click to expand the reverting instructions
Reverting easily
The easiest way to revert is by following the restoring instructions from the universal installation instructions, which will leave your 6T running OxygenOS 10 completely stock:
Windows Driver Setup
Now we need to setup our x86_64 (Intel/AMD CPU) Windows computer so it can interact with the 6T. Make sure that BitLocker is off (or at least paused), then ensure that Secure Boot is disabled (if you're using a UEFI computer).
Now you can install drivers:
- Run
bcdedit.exe -set TESTSIGNING ONto enable test signing (the Qualcomm EDL 9008 drivers aren't signed for normal use) - Reboot your computer
- Install the EDL 9008 drivers and reboot if it asks you (extract
Qualcomm_QDLoader_HS-USB_Driver_64bit_Setup.zipand run the setup program) - Install the OnePlus USB Drivers (extract
OnePlus_USB_Drivers.zipand runOnePlus_USB_Drivers_Setup.exe) - Reboot one final time
Restoring Android 10
- Power off your OnePlus 6T
- Press and hold both volume buttons on the 6T, then plug it into your computer
- Run MsmDownloadTool V4.0.exe (extract
fajita_41_J.50_210121.zip)
The 6T should show up in MsmDownloadLook like it does here:
Click Start on the top left to start the restore process, then wait a few minutes. Once it's done, you'll see 'Download Complete' in green and the phone should reboot and start loading Android.
Reverting manually
Instructions for reverting manually will come in an update if there's enough demand.
Final Result
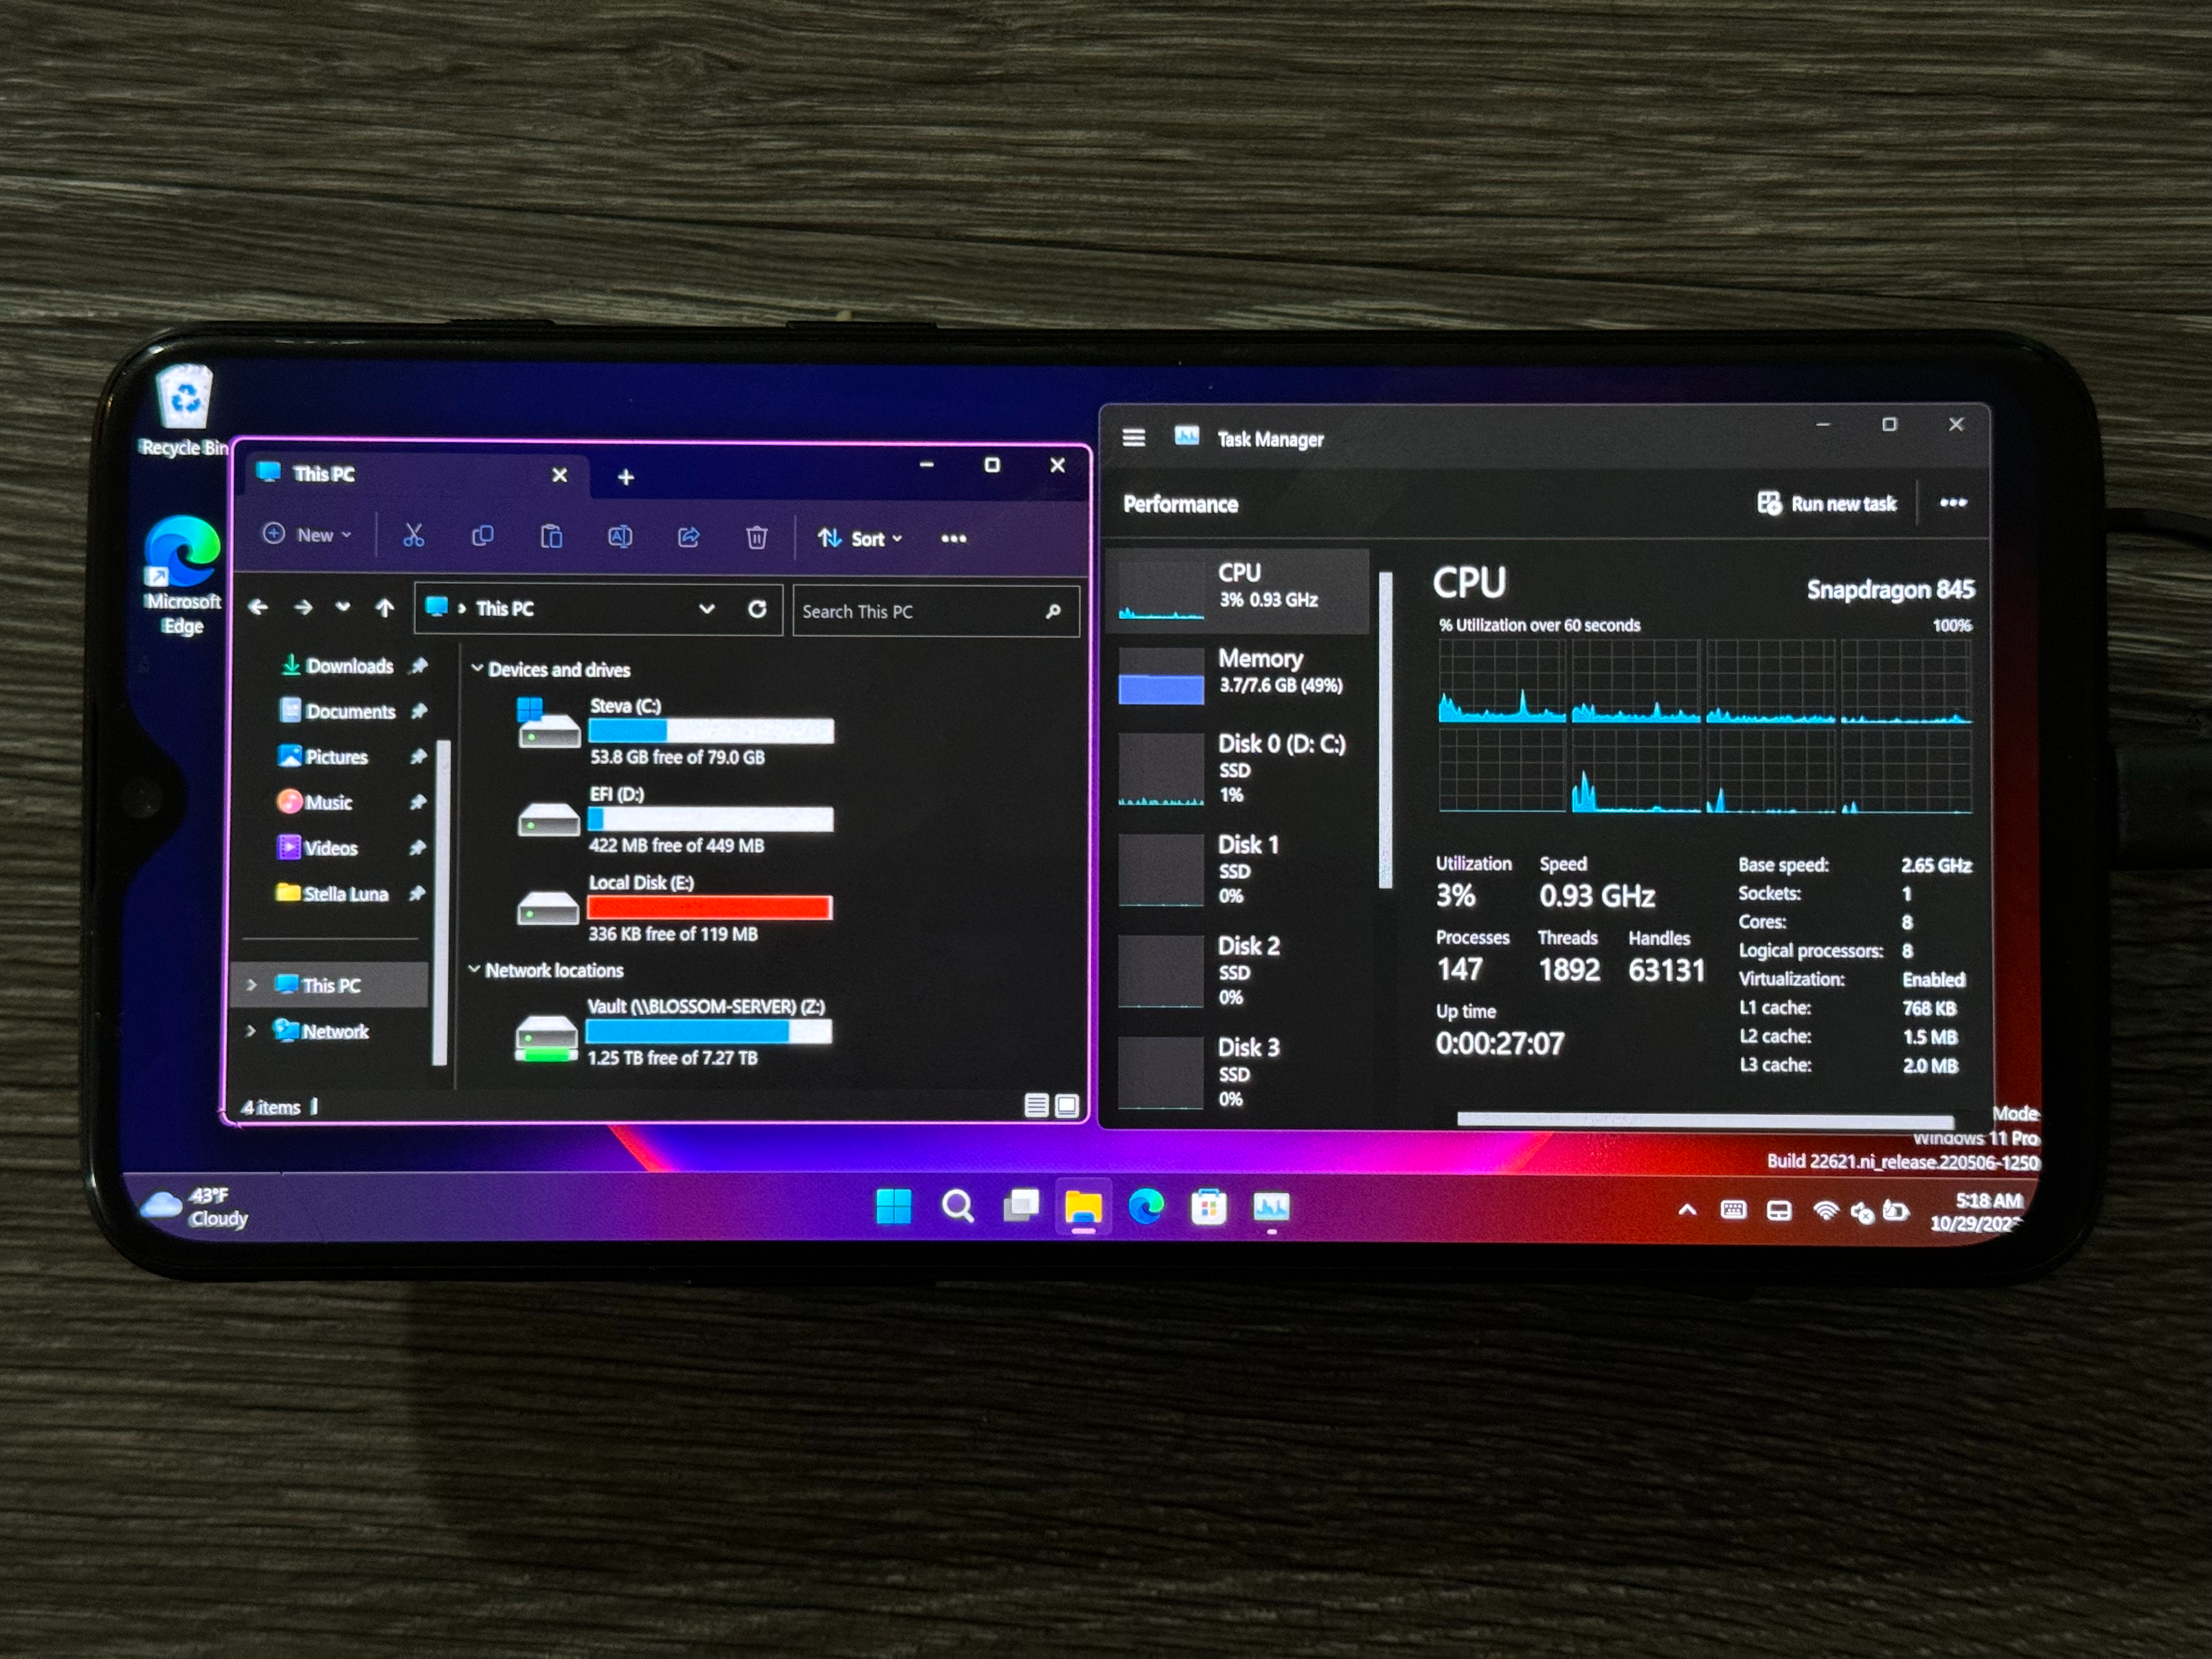 Task Manager and File Explorer running in Windows
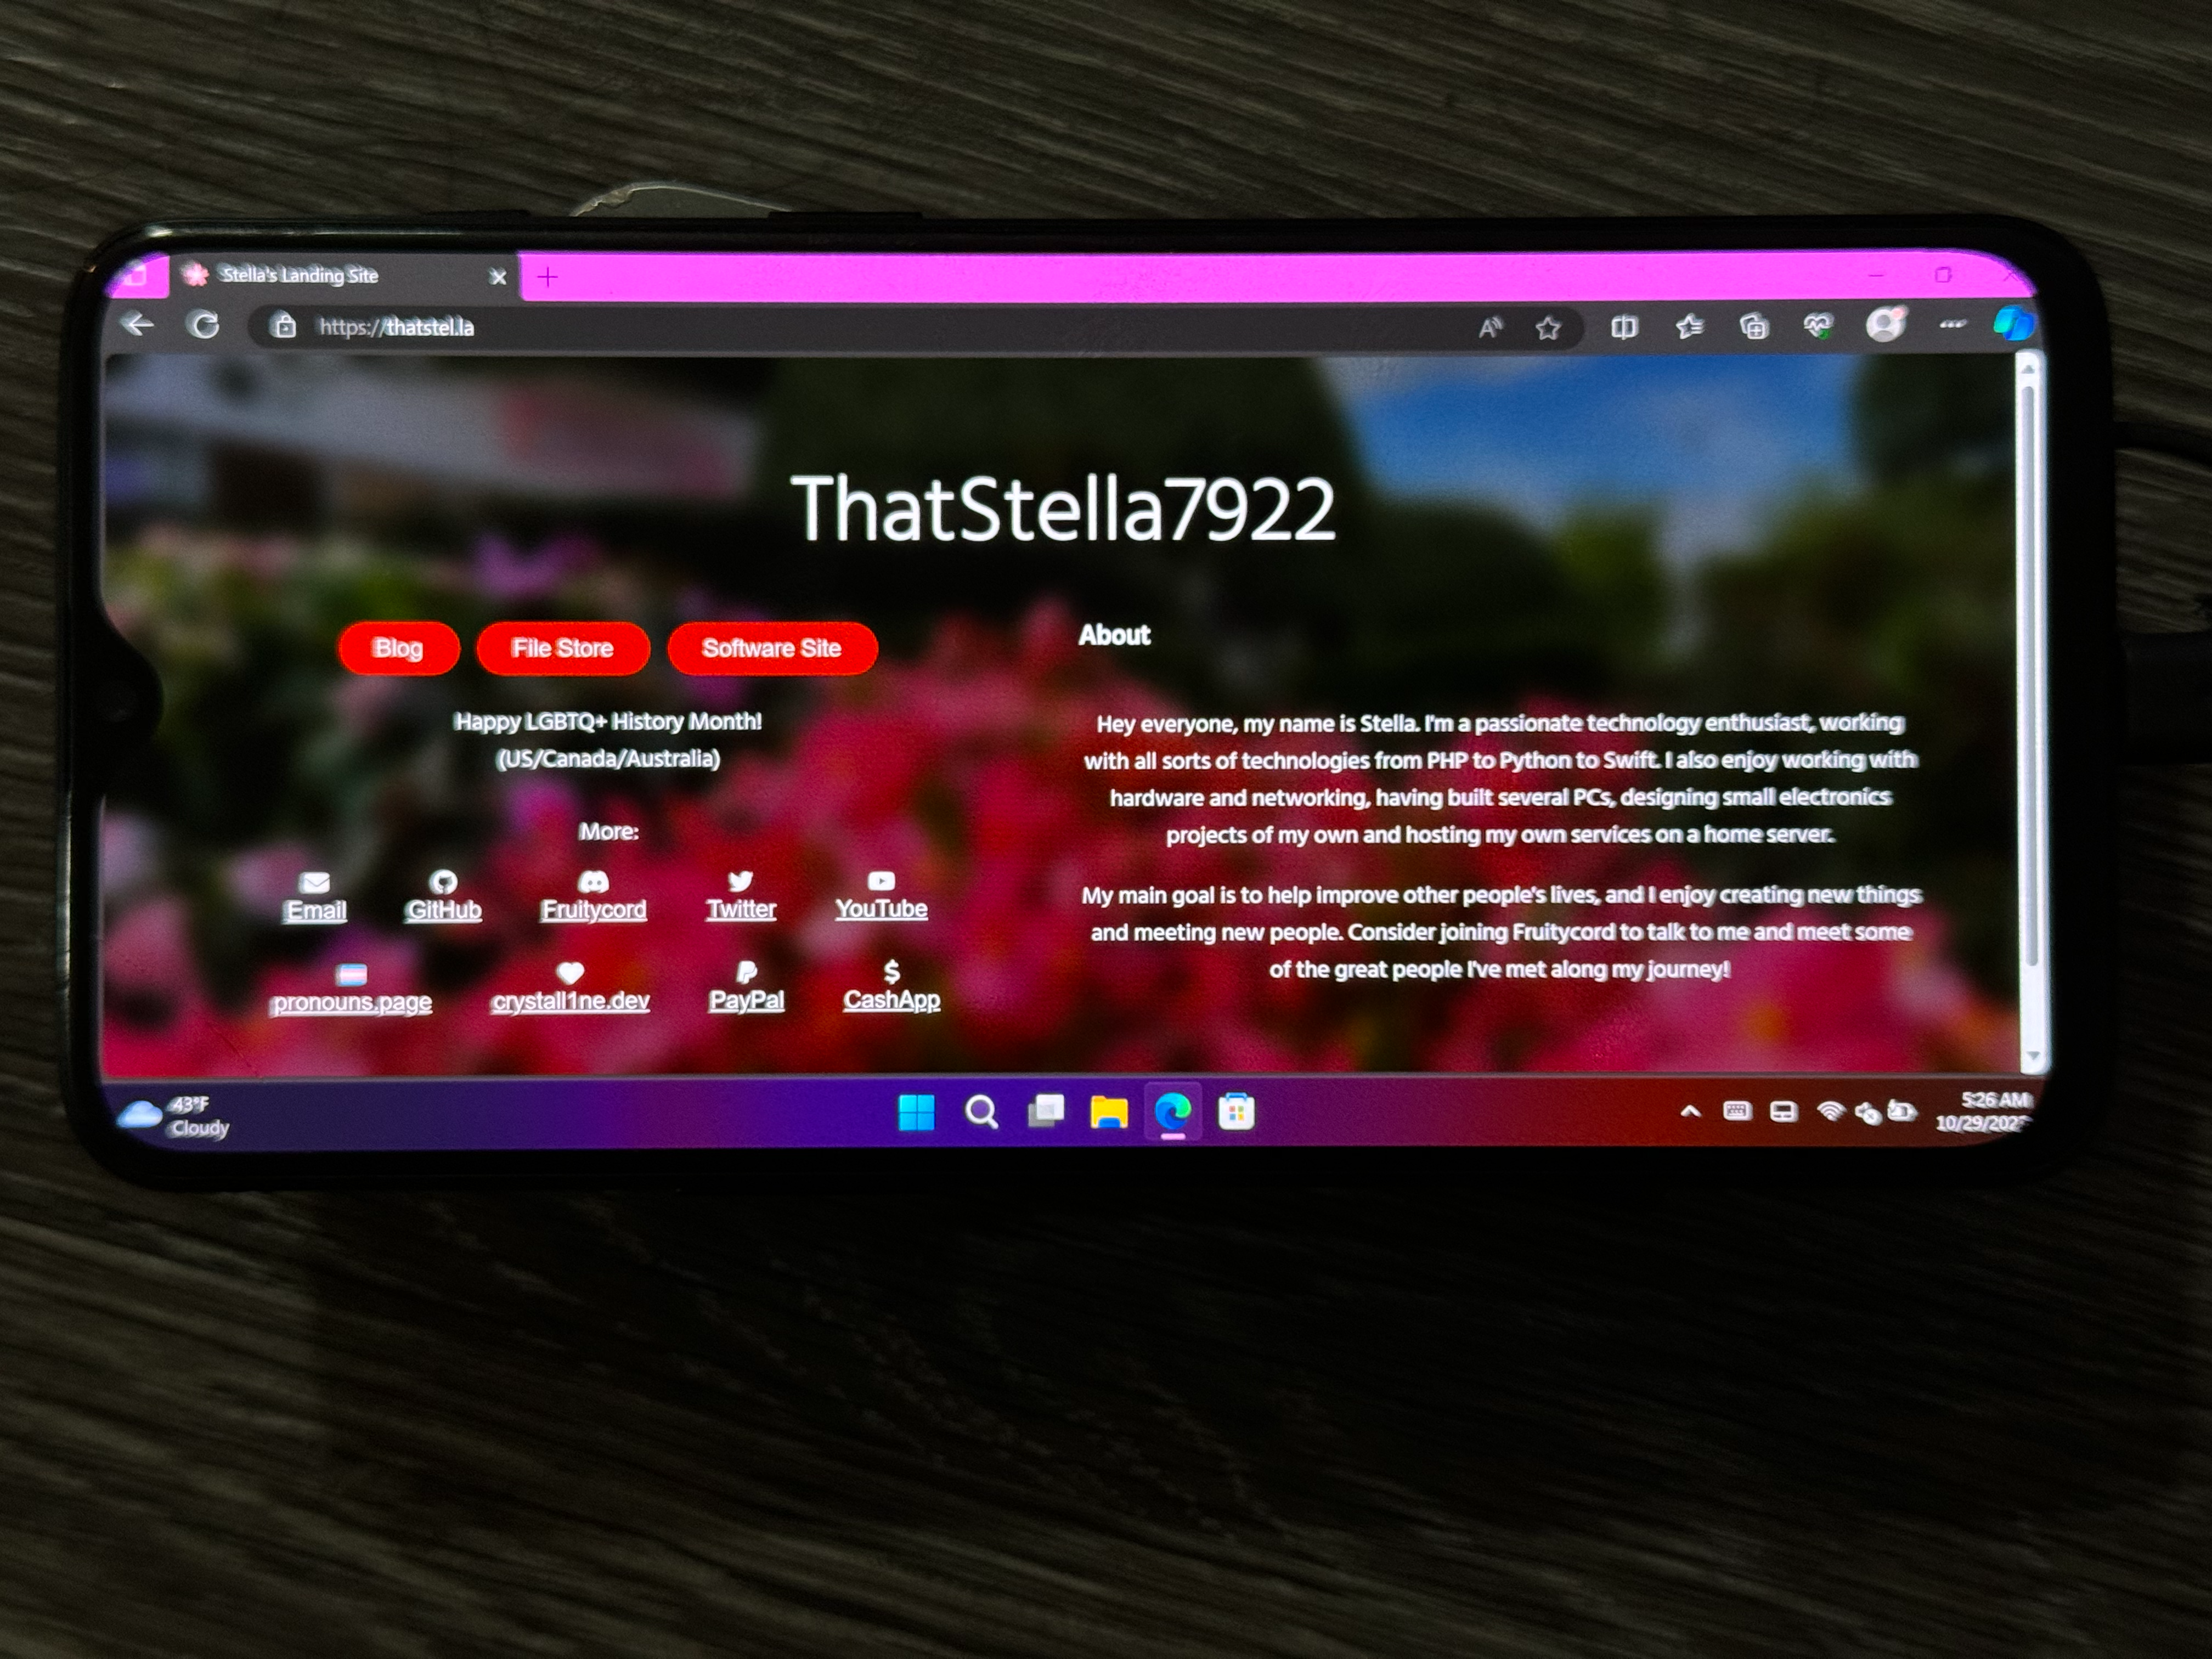 My landing page running on Edge in Windows
Compatible Software
Windows 11 ARM supports running x86 and x64 desktop apps just fine, and this includes a good amount of desktop PC games. You can run Steam and older games like Portal 2 oretty well, and others have gotten games like GTA 4 and Rise of the Tomb Raider to run, with mixed results.
ARM-native apps also exist, and you can run things like UWP/Bedrock Minecraft, 7-Zip, Firefox, VLC and even the full Office 365, all ARM64-native.
Unfortunately, anything that requires a kernel-level anti-cheat or custom drivers will not work, as you can't run x86/x64 drivers on ARM64 Windows. The translation layer only works for apps.
Final Thoughts
Windows 11 ARM on the 6T is impressive, showing a surprisingly fleshed-out software catalogue and mostly functional hardware with decent battery life. However, it's not something I would call daily-driveable and is more useful as an experiment or novelty rather than something you'd actually want to use.